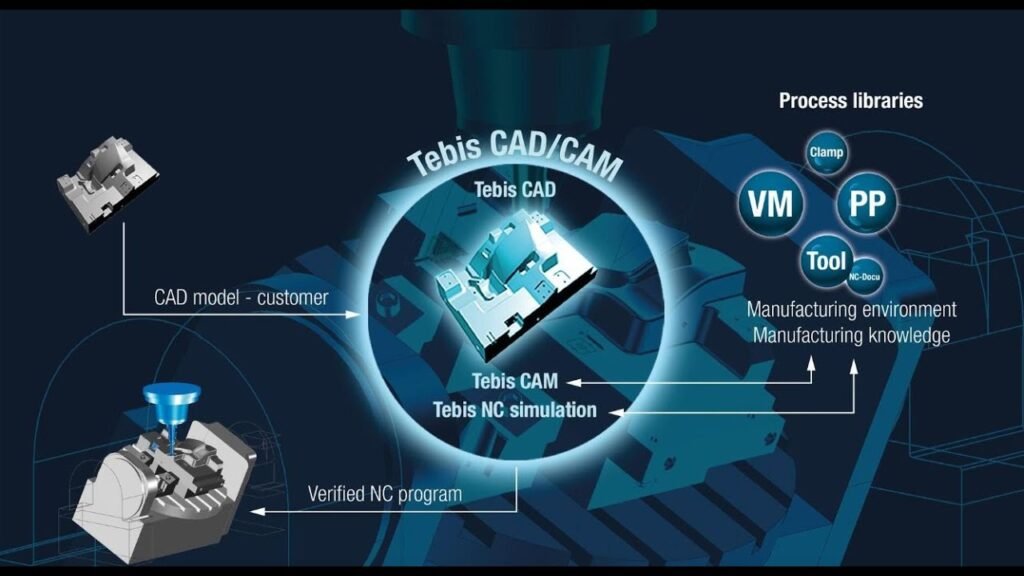
CNC automation has changed how manufacturers turn ideas into finished products. Instead of relying on manual labor at every step, businesses now use computer-controlled systems to design, program, and produce parts with speed and accuracy. This guide walks through the entire CNC automation process, from initial design to final production, so you understand exactly how a digital concept becomes a physical part.
What Is the CNC Automation Process?
The CNC automation process is a series of connected steps that transform a digital design into a finished, machined product. It combines software design tools, programming languages, and automated machinery to produce parts with minimal human intervention.
Why This Process Matters for Manufacturers
Understanding each stage helps manufacturers reduce errors, save time, and cut production costs. It also helps business owners evaluate where automation can improve their existing workflow.
Step 1: Product Design With CAD Software
Every CNC automation process begins with a digital design. Engineers use Computer-Aided Design (CAD) software to create detailed 2D or 3D models of the part.
Key Elements Defined During Design
Exact part dimensions and tolerances
Material type and thickness
Surface finish requirements
Functional features like holes, threads, or slots
A well-designed CAD model reduces errors later in the process. Therefore, accuracy at this stage saves significant time down the line.
Step 2: Converting Designs Into Machine Instructions
Once the design is complete, it must be translated into a language the CNC machine understands. This is where CAM (Computer-Aided Manufacturing) software comes in.
How CAM Software Works
CAM software analyzes the CAD model and generates toolpaths, which are the exact routes the cutting tool will follow. It also determines cutting speeds, feed rates, and tool selection based on the material.
G-Code Generation
The CAM software then converts these toolpaths into G-code, a programming language that tells the CNC machine exactly how to move. Additionally, M-code manages supporting functions like coolant flow and tool changes.
Step 3: Machine Setup and Calibration
Before production begins, the CNC machine must be properly set up. This step ensures accuracy and prevents costly mistakes during machining.
Tasks Involved in Setup
Mounting the correct cutting tools
Securing the raw material to the worktable
Setting the machine’s zero point (origin)
Calibrating axes for precise alignment
Proper setup is critical. Even small misalignments can cause defective parts or damaged equipment.
Step 4: Running a Test or Simulation
Many manufacturers run a simulation before actual production. This step catches errors early, saving both material and machine time.
Benefits of Simulation Testing
Simulations allow operators to visualize the entire machining process without cutting real material. As a result, they can spot collision risks, incorrect toolpaths, or programming errors beforehand.
Dry Runs on the Physical Machine
Some shops also perform a dry run, where the machine executes the program without engaging the cutting tool. This confirms that movements match expectations before committing to actual production.
Step 5: The Machining Process Begins
Once setup and testing are complete, actual production starts. The CNC machine executes the programmed instructions automatically.
What Happens During Machining
The spindle rotates the cutting tool, while servo motors move the workpiece or tool along programmed axes. Meanwhile, feedback sensors continuously monitor position and speed, correcting any deviations in real time.
Coolant and Chip Management
During cutting, coolant systems reduce heat and friction, protecting both the tool and material. At the same time, chip conveyors remove debris, keeping the work area clean for consistent results.
Step 6: Quality Inspection and Verification
After machining, the finished part undergoes inspection to confirm it meets design specifications.
Common Inspection Methods
Manual measurement using calipers or micrometers
Coordinate Measuring Machines (CMM) for high-precision checks
Visual inspection for surface finish and defects
This step ensures the part matches the original CAD design within acceptable tolerances. Consequently, any deviations can be caught before the part moves further down the production line.
Step 7: Post-Processing and Finishing
Many CNC-machined parts require additional finishing steps before they’re ready for use or assembly.
Common Post-Processing Techniques
Deburring to remove sharp edges
Surface polishing or coating
Heat treatment for added strength
Anodizing or painting for corrosion resistance
These finishing touches improve both the appearance and functionality of the final product.
Step 8: Packaging and Delivery
Once inspection and finishing are complete, parts are packaged for shipment or moved into assembly for larger products.
Why This Step Still Matters
Proper packaging protects finished parts from damage during transport. Additionally, accurate labeling ensures parts are correctly identified throughout the supply chain.
How Automation Improves Each Stage of the Process
CNC automation doesn’t just speed up machining — it improves accuracy and consistency across every step. For example, automated tool changers reduce downtime between operations. Similarly, real-time feedback systems catch errors instantly, preventing defective parts from reaching inspection.
Reduced Human Error
Because much of the process is computer-controlled, automation significantly reduces the mistakes that come from manual operation.
Increased Production Speed
Automated systems can run continuously with minimal supervision, allowing manufacturers to produce more parts in less time.
Improved Consistency
Every part produced follows the exact same programmed instructions. Therefore, automation ensures uniform quality across large production runs.
Challenges to Consider in CNC Automation
High Initial Investment
CNC machines and automation software require significant upfront costs, which can be a barrier for smaller manufacturers.
Need for Skilled Programmers
While automation reduces manual labor, it increases the need for skilled CAM programmers and machine operators who understand the software and hardware involved.
Maintenance Requirements
Automated CNC systems still require regular maintenance, including tool replacement, calibration checks, and software updates, to maintain consistent performance.
Final Thoughts
The CNC automation process transforms a simple design into a precisely manufactured product through a series of connected, technology-driven steps. From initial CAD modeling to final quality inspection, each stage plays a critical role in ensuring accuracy, efficiency, and consistency. Understanding this process helps manufacturers optimize their workflow, reduce costly errors, and make informed decisions about integrating automation into their production line.